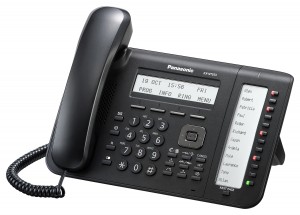
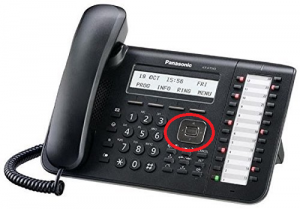
Download Paper Labels for KX-DT543 Handsets
Making Calls
Making Calls
 To call an extension (Intercom Call)
• Lift handset
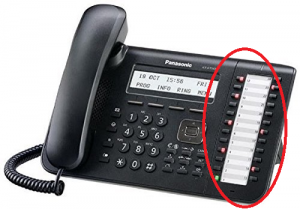
• Dial Extension Number or Press DSS key
To call an operator (Operator Call)
• Lift handset
• Dial “9”

To Call an Outside Number
• Lift handset
• Dial “0” to access a line, + Phone Number
Or
• Lift the handset
• Press “Line/Loop” key. + Dial Phone Number
Transferring Calls
Transferring calls
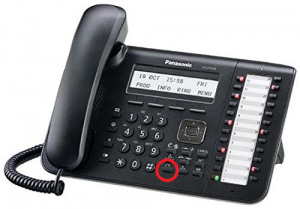 Transferring to an Extension on the PBX
• Press Transfer Key
• Dial Extension Number
• Replace handset or Announce call and Replace handset
OR

• Press DSS key of desired party
• Replace handset or Announce call and Replace handset
OR

Transferring to an Outside Number
• Press Transfer Key
• Dial “0” + Phone Number
• Wait for answer, Announce call and Replace handset
Holding Calls
Holding calls
 To place a call on hold press the HOLD button. This allows you to make another call or fetch that file you need.
Retrieving calls
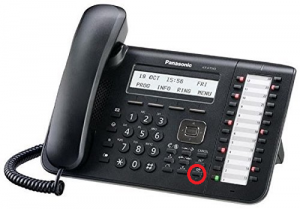
Press the line/intercom button that is flashing green on your handset.

If your line buttons are numbered, you can retrieve a held call at another handset by pressing the same numbered line key flashing red. Once the key is pressed the call will be retrieved.
Note that if line keys are not numbered on your handset this feature isn’t available.
Please refer to Call Park for alternate holding/transferring feature
Call Pick Up
Call Pick Up
Answering a Call from another Telephone (Call Lift)
You can answer an incoming call that is ringing at another extension or group from your phone without leaving your desk.
The following types of Lift are available:
Group Call Lift: Picks up a call within your group.
Directed Call Lift: Picks up a specified extension’s call.
Answering a call by using Keys:

A call ringing at another phone may present on your phone as a flashing key on your phone.
Either a flashing Line Key, or a Flashing DSS key assigned as the extension that is ringing.
To answer the call, press the flashing key.
Answering via Group Lift:
• Lift Handset
• Dial “*40 + Group No”, ie: *40601
Answering via Directed Call Lift
• Lift Handset
• Dial “*41 + Extension No”, ie: *41201
Parking Calls
Park a Call
Call parking enables you to park (hold) a call in a common zone so any extension can retrieve the call. This can be used as a transferring feature. A call can be parked in a specified parking zone manually or automatically depending on whether a designated call park button has been assigned.
Ask caller to hold, press call park button. This places the call in park position marked on the Call park Button (usually 1,2,3 or 4 is most common).
Lift handset, press the call park button where call is parked (usually 1,2,3 or 4).
Conference Calls
Conference Calls
A user can establish a conference call to an existing two party conversation. This PBX supports three-party through eight-party conference calls. Conferences with more than four parties are only possible when a user originates the conference.
Unattended Conference:
• The conference originator can leave the conference and allow other parties to continue.
• Unattended Conference allows the originator to return to the conference. Unattended Conferences can only be established by users.
To make a conference call
1. Dial the first party, either internal or external. After answer press the conference key which automatically holds the call.
2. Dial the extension number or “0” for an outside line followed by the second party’s telephone number.
3. After answer press the conference button again to bring this person into the conference call.
4. Repeat this procedure until you have the designated number of parties in the conference.
5. All parties can now talk simultaneously.
Warning if you entered the conference and exited again it would terminate the call for all parties.
Note: – Maximum of 8 people on digital handset
– Maximum of 2 other people making a 3 party call on analogue handsets.
Dial first party Press conference Dial “0” for another line.
wait for answer. button. Or dial Ext. No.
Press conference Press conference key Dial 2nd party’s key to exit to bring 2nd party into wait for answer. call or to call 3rd conference. Repeat party etc. procedures for other parties.
One Touch keys
One Touch Keys
A user can access a person or feature by pressing a single button. This is activated by storing the number (e.g., extension number, telephone number, or feature number) in a One-touch Dialling button.
 BUTTON PROGRAMING – ONE TOUCH DIALLING
As an alternative of using your Personal Directory space you can assign spare DSS buttons to frequently used numbers.
• Phone on idle, press PROGRAM button
• Press a spare DSS button
• Dial ‘2’ then ‘0’ then your desired phone number (max. 32 digits)
• Press ENTER or AUTODIAL/STORE button
• Confirmation tone
• Press EXIT
 BUTTON PROGRAMING – EXTENSION
Create extension button at your phone which has not been assigned. Also use the same procedure to change existing extensions.
• Press PROGRAM
• Press spare DSS button
• Dial ‘1’ followed by the extension number
• Press ENTER or AUTODIAL/STORE button
• Confirmation tone
• Press EXIT
Call Forward
Call Forward
Call forwarding is a valuable feature. Calls will forward to programmable destinations in different methods internally or to external destinations.
All Calls:
All calls are forwarded. Pre-set extensions may also forward from their own receiving group.
Busy:
All calls are forwarded when your extension is busy.
No Answer:
All calls are forwarded when you do not answer the call in a specified time period.
Busy/No Answer (BSY/NA):
All calls are forwarded when you do not answer in a specified time period or when your extension is busy.
Call forwarding
Forward All Calls Immediately
• Dial *7102 + EXT + #
Or
• Dial *7102 + “0” + external number + #
Forward All Calls on Busy and No Answer
• Dial *7105 + EXT + #
Or
• Dial *7105 + “0” + external number + #
Forward All Calls on Busy Only
• Dial *7103 + EXT + #
Or
• Dial *7103 + “0” + external number + #
Forward All Calls on No Answer only
• Dial *7104 + EXT + #
Or
• Dial *7104 + “0” + external number + #
Dial *7100 (Star7100)
Pressing the FWD/DND button (fixed button) while in idle status will cycle the setting between FWD – DND – OFF
Paging
Paging
Users can announce to several handsets simultaneously through the phone speaker or external speakers (external pagers). You can also connect external paging systems for larger areas.
You can make a voice announcement to digital telephones (Telephones with speakerphone capabilities) as well as external speakers simultaneously.
To page
Press the ‘PAGE’ button labeled ‘Page’
WAIT for the confirmation tone
Announce message
OR
If a Page Key hasn’t been programmed on your DSS Keys
• Lift Handset
• Dial *33 followed by Page Group (01-32) eg *3301 for Page Group 1
• By Default *3301 is an ALL CALL PAGE
Walking Class of Service
Walking Class of Service
• You can use your calling privileges (Class of Service) at another extension. You may override restrictions which have been set.
To use this feature, an original extension number and an extension PIN (Personal Identification Number) are required.
NOTE: This is a very handy feature used by staff always on the move throughout the office
To use
• Lift handset
• Dial *47
• Dial your own extension Number
• Dial your PIN (default 1234, easy to change)
• WAIT for confirmation tone & dial tone
• Dial “0” to access an outside line
• Dial desired phone number
Extension restrictions resume at completion of call
System Speed Dials
System Speed Dials
System Speed dials can be programmed via the Handset. The speed dial name and number are programmed separately against a location number. One thousand locations are available (000-999)
Program speed dial number
– From Handset
– Press PROGRAM, * *, 1 2 3 4
– Dial speed dial programming number 001
– Press ENTER key on screen.
– Dial speed dial position (000-999) or NEXT on the screen
– Dial zero, followed by the number to be stored.
– Press the AUTO DIAL/STORE key to save number.
– Press HOLD followed by PROGRAM to exit.
Program Speed Dial Names
– System (000-499)
– System must be programmed from extension 201
– To program name
– PROGRAM, * *, 1 2 3 4
– Dial speed dial name programming number 002
– Press ENTER key on the screen.
– Dial speed dial position (000-499) or NEXT on the screen.
– Enter name using the key pad, then follow screen prompts.
Ie. For A press 2 on the key pad
Now you will see the letters appear on the bottom of the
screen. Press the button that represents the A. Repeat this
process for each letter.
– Press the AUTO DIAL/STORE key to save the name.
– Press HOLD followed by PROGRAM to exit.
Using Speed Dials
Using speed dials
– Lift the handset, dial * plus the position number of the speed dial, ie: “*001”
– Press Autodial
– Type via the keypad the name you require
– Scroll using the up/down scroll pad, to locate
– When number is displayed, Lift handset to originate call, or press the call button shown on the screen for hands free.
NB. The Phone system must have a name entered for this to work
Voice Mail
Your Voice Mail may be programmed to present a “Subscriber Tutorial” to you the first time you log in to your mailbox.
If the Subscriber Tutorial is enabled, Voice Mail prompts will guide you through the mailbox configuration process.
Follow the prompts, you can configure the following items.
You can configure these items later manually if necessary, as explained later in this section. This feature may be disabled by the System Administrator or System Manager for your mailbox.
Password: If your mailbox has a password, you must enter it using the dial keys (0–9) whenever you log in to your mailbox. Your password can contain up to 16 digits.
Subscriber’s Name: This is a recording of your name. Other subscribers will hear your name when they listen to messages you left for them. It may also be heard by callers when they use the Dialling by Name feature.
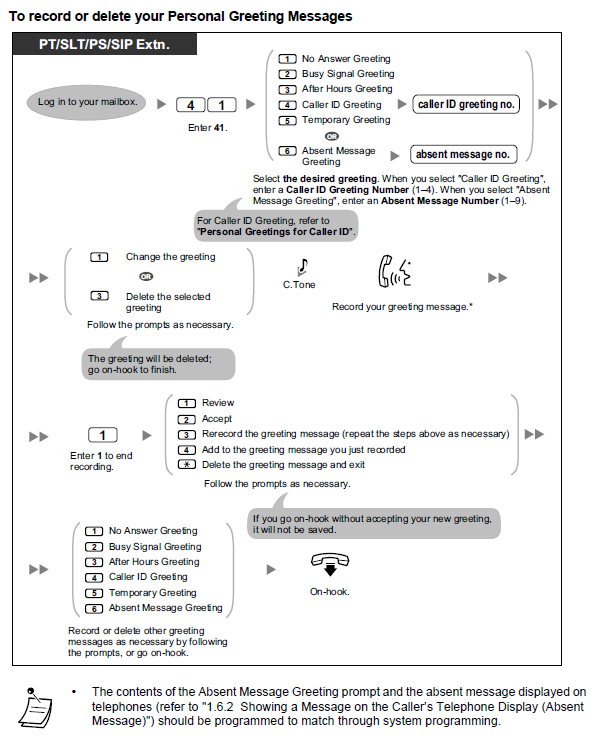
Personal Greetings: When callers are directed to your mailbox they will hear one of 3 Personal Greeting Messages. After the greeting is played, a tone will sound, and the caller can leave a message.
• No Answer Greeting: Heard by callers when you do not answer their calls. A common example might be, “This is (name). I can’t take your call right now…”.
• Busy Signal Greeting: Heard by callers when you are on another call. A common example might be, “This is (name). I’m on another call right now…”.
• After Hours Greeting: Heard by callers when the VPS is in night mode. A common example might be, “This is (name). I’ve gone home for the day…”.
To Log in First Time
1. Lift Handset
2. Dial “500”
3. Follow prompts to setup Voicemail
Night Mail Box
Afterhours or Night calls that are directed to a Mailbox, usually make use of a virtual mailbox.
To record Night Message:
Lift Handset
Dial Voicemail Pilot number-(usually 500)
When answered dial #6
Dial * + Night mailbox number ( usually 602)
On answer dial 3 1 1
Follow prompts and record greeting
Dial 1 to end recording
– To review press 1
– To erase & try again press 3
– To save press 2
o To exit – Replace handset
Messages left in this virtual Mailbox indicate on a programmable Message Wait Key.
To set Message Wait Key on a Handset.
Press “Program”
Press desired flexible button.
Dial 40 + Mailbox Number (602)
Press Autodial/Store Key
Press Pause to exit
Group Mail Box
Group calls that are directed to a Mailbox, usually make use of a virtual mailbox.
To record Group Message:
Lift Handset
Dial Voicemail Pilot number-(usually 500)
When answered dial #6
Dial * + Night mailbox number
On answer dial 3 1 1
Follow prompts and record greeting
Dial 1 to end recording
To review press 1
To erase & try again press 3
To save press 2
To exit – Replace handset
Messages left in this virtual Mailbox indicate on a programmable Message Wait Key.
To set Message Wait Key on a Handset.
Press “Program”
Press desired flexible button.
• Dial 40 + Mailbox Number
Press Autodial/Store Key
Press Pause to exit
Recording A Night Message
• Lift handset, dial 500
• Wait for answer
• On answer- Dial #6 *998
• When pin requested – dial 1234
• On answer- Dial 5 3 1
– Record Message
– Follow prompts to save
Accessing your Voicemail Remotely
Access your Voicemail remotely:
• Dial your direct in dial number
• Wait for voicemail to answer
• Dial #6 * … your extension number
• Enter your password when prompted
• Follow prompts to hear message
Headsets
Select “Headset on” in programming mode or set the Headset button on (red) before making a call.
When Handset is Headset Mode, the SP-Phone Key becomes an Answer/release key.
Placing Phone in Headset Mode With handset on Hook,

Press Program Key
Dial or scroll to 61, press enter
• Press SEL, toggle to on,
• Press Enter
• Press Exit
HOW TO CREATE A HEADSET BUTTON
In headset mode, press the speaker phone button to hear dial tone on headset.
When handset is idle:

– Press the ‘PROG’ button.
– Select the ‘DSS’ button that you want to program the headset mode under.
– Dial 67 and the word headset should appear on your screen.
– Press the Enter button or ‘AUTO DIAL/STORE’ to save.
• The headset button is “RED” when in headset mode.
• Press “Headset” button to turn off headset.
Setting Ring Tones
Change your ring tones for both internal and external calls.
• Press ‘PROG’ button from the screen
• Press the ‘INTERCOM’ or ‘LINE’ key twice. The screen will display tone type
Note that the intercom key is for internal calls and transfers, and the line key is for incoming calls from Trunks. If changing the tone for incoming Trunk calls, you must change all Line keys
• Use the arrow pad up or down till you find tone
• Once tone is decided you store this by pressing ‘ENTER’ or ‘AUTODIAL/STORE button.
• Confirmation tone will sound
• Lift handset then Replace handset
Changing Extension Names
• Press button below ‘Prog’
• Dial **
• Dial 1234
• Dial 004
• This will enter into the name field
• Press the button below the prompt ‘ENTER’ on screen
• Select the extension number of the name needed for change
• Screen will read: Ext Name 201: BOB
Type in name as it will clear over the name already stored (use letters from pad just as you would with a mobile phone. When you have a name with two letters the same eg: Jill enter ‘l’ then press the right arrow at the bottom of your phone, wait for the black box to flash then enter you second ‘l’.)
• Press AUTODIAL/STORE button or ENTER KEY.
• Lift handset and Replace Handset
Background Music
You can listen to the background music through your telephone speaker while on-hook. An external music source, such as a radio, can be connected. If your extension becomes busy (off-hook, making or receiving a call etc.), the music stops temporarily. When you go back on-hook, the music starts again.
To turn on
• Lift handset
• Dial *7511
To turn off
• Lift handset
• Dial *7510
Recording Queueing and DISA Messages
The manager extension can record three kinds of greeting messages (OGM – Outgoing Message) as follows:
1. DISA message: Used to greet and guide callers to access an extension user group or outside party without operator assistance.
2. Incoming Call Distribution Group message: Used to greet and guide callers to an incoming call distribution group.
3. Timed Reminder message: Used for a wake-up call message when the extension answers the Timed Reminder.
All messages have their own extension numbers. You can select the desired message.
To record:
• Lift Handset
• Dial *361
• Dial desired Message Number ( 501-563)
• Wait for timer to start on display
• Record message
• Press Autodial/Store to save message
• Message is played back
• To exit- Replace handset
To Playback
• Lift Handset
• Dial *361
• Dial desired Message Number ( 501-563)
• Message is played back
• To exit- Replace handset
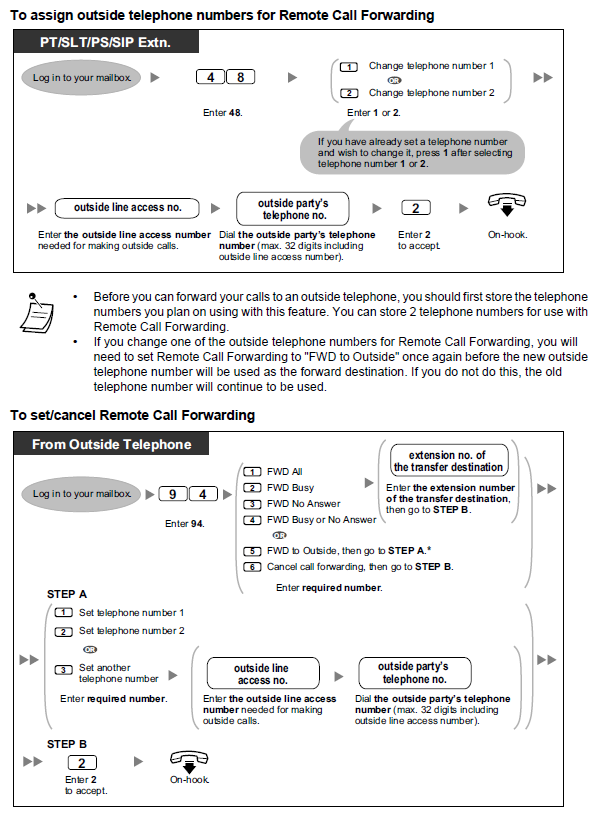
Call Forward Main Incomming Lines
Incoming calls on Main Number are usually treated differently to other numbers. As such normal Handset call forwards do not work.
If you wish to forward an Incoming Ring group to another number, use the following:
To Set Forward
• Lift Handset
• Dial * 7141
• Dial “Group Number”, (default Main Incoming Group is usually 601)
• Dial “0” + desired phone number
• Dial #
• Receive Confirmation Tone
• Replace handset.
To Cancel Call Forward.
• Lift Handset
• Dial * 7140
• Dial “Group Number”, (default Main Incoming Group is usually 601)
• Dial #
• Receive Confirmation Tone
• Replace handset
Group Log In/ Out
You can control your status in an incoming call distribution group. When in the Log-out mode, incoming calls to the group will not ring at your extension. When you return, calls will again ring at your extension. (Default: Log-in).
Your phone will be set with a Login key.
This will control what group/ all groups that will be logged out of.
To operate, press the key.
To switch from logged in/ logged out.
Conference Phone Tutorial (Polycom)
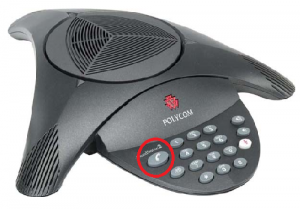
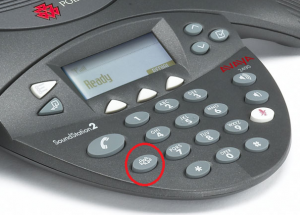
1. Press the button on the Polycom resembling a handset (This button lifts the handset electronically).
2. You will hear dial tone.
3. Dial ‘0’ for an outside line
4. Dial phone number of the first person
5. After answer, advise the party of the conference, kindly ask to hold.
6. Press the conference button on the Polycom (looks like 3 people standing) Located below button used in step 1. This places the party on hold while you add the next party.
7. Dial ‘0’ for an outside like followed by the phone number of the second person required.
8. After answer advise the party of the conference
9. Press Conference button
10. Dial ‘3’ to start the conference.
11. Conference established
Call Monitor
Allows an extension user to listen to a busy extension user’s existing conversation. The user can hear the conversation, but the user’s voice is not heard. If desired, interrupting the call to establish a three-party conference call is available.
Conditions
• Class of Service programming determines extension users who can use this feature.
• This feature is available only when the busy extension is in a conversation with another extension or outside party.
• This feature does not work when the busy extension is in one of the following conditions:
a) Executive Busy Override Deny (® 1.8.2 Executive Busy Override) or Data Line Security (®1.11.5 Data Line Security) has been set.
b) While receiving OHCA (® 1.8.4.3 Off-hook Call Announcement (OHCA)) or Whisper OHCA (®1.8.4.4 Whisper OHCA).
c) During a Conference call (® 1.14.1 Conference Features).
d) During a door phone call (® 1.17.1 Door phone Call).
e) While Live Call Screening (LCS) or Two-way Record is activated (® 1.24.3 Voice Mail DPT (Digital Integration).
f) During Consultation Hold.
This feature stops when the busy extension user presses the following buttons during a conversation
1. FLASH/RECALL button
2. HOLD button
3. TRANSFER button
4. CONF (Conference) button
5. DSS button
6. EFA button
7. Two-way Record button
8. Two-way Transfer button
9. One-touch Two-way Transfer button
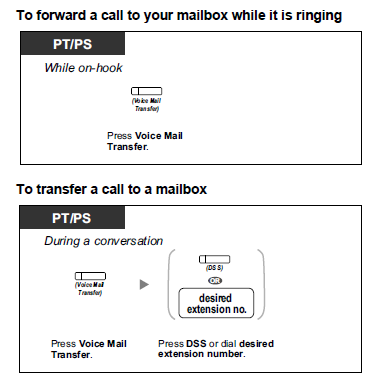
10. Voice Mail (VM) Transfer button
To Monitor:
Dial the User extension number, or push users DSS key,
As they are on the phone you will hear Busy Tone, Dial 5 to monitor the call.
Executive Busy Override or Barge in
Dial the User extension number, or push users DSS key,
As they are on the phone you will hear Busy Tone, Dial 3 to barge into the call as a three way conference call

